
 Cupcakes have a way of making me smile. Maybe it’s the fact that these perfect treats resemble miniature cakes, and who doesn’t smile at the sight of an iced celebratory cake with perfect loopy prose spelling their congratulations? But cupcakes are really something special: eating a cupcake is like saying congratulations to yourself for picking such a lovely treat to feast on. Also, eating a cupcake always presents a bit of a struggle. It’s so hard to get the perfect balance of cake and frosting in each bite. But this struggle makes the cupcake even more fun. The petit round desserts are always beautifully decorated; it is the simplicity that really adds to their perfection in my opinion. There are countless ways a simple cupcake can taste, so many bold flavors can be baked into the cake base and the frosting is what really gives a cupcake its character.
The other day, I really needed to make cupcakes. There was no occasion, I just had to bake. I chose cupcakes to play the main role, and set out to pick the batter flavor and frosting that would play the lead supporting actors. I didn’t go into this search haphazardly though, I was prepared, I had an idea. My idea took me to 4 years ago when I went to visit family in Iran for a wedding. One sunny afternoon before the wedding, my aunt took me and my mother to a cute but crowded corner bakery called Bebe (pronounced bee bee). We chose as our poison a lovely chocolate cake with a thick rich chocolate icing that had hints of espresso baked right in. This cake was delicious: it was the yummiest cake ever, seriously. I needed to recreate this flavor in my cupcakes.
After searching through online baking blogs, I finally found a good recipe for a flavorful but not overpowering chocolate cake base and an amazing recipe for a bold dark chocolate espresso frosting. This recipe is adapted from a blog titled Bakeaholic. After a quick trip to the grocery store, I was ready to bake. The recipe is shown below.
Chocolate Cupcake Base
Ingredients:
3/4 cup + 1 tablespoon. flour
1 cup sugar
1/4 cup + 1 tablespoon unsweetened cocoa powder
1 teaspoon baking soda
1/2 teaspoon baking powder
1/2 cup milk
1/4 cup vegetable oil
1 egg
1 teaspoon vanilla extract
1/2 cup boiling water
1 teaspoon instant coffee
Directions:
1. Preheat oven to 350 degrees. Line standard muffin tin with paper liners.
2. Stir the instant coffee into the boiling water until dissolved. Set aside.
3. Combine flour, sugar, cocoa powder, baking soda, and baking powder into a bowl. In another bowl, combine milk, oil, egg, and vanilla. With an electric mixer, slowly add the wet ingredients to the dry. Add the coffee with the mixer still on.
4. Distribute the batter, filling each cupcake well 2/3 full. Bake for 18 to 22 minutes.
Dark Chocolate Espresso Frosting
Ingredients:
1/4 cup + 1/2 tablespoon unsweetened cocoa powder
1 teaspoon instant coffee
1/4 cup + 1/2 tablespoon boiling water
1 cup butter, room temperature
1/4 confectioners’ sugar
1 cup dark chocolate, melted and cooled
Directions:
1. Combine the cocoa and the boiling water, stirring until the cocoa has dissolved. Add the instant coffee. Stir until dissolved.
2. Melt the dark chocolate chips in the microwave and then place then in the refrigerator to cool. Be sure not to let it harden!
3. With an electric mixer, beat the butter and confectioners’ sugar until fluffy. Add the melted and cooled chocolate, beating until combined. Beat in the cocoa and coffee mixture.
4. Use a pastry bag to pipe frosting onto cooled cupcakes.
This recipe took some alterations from the original, but the final product was just what I had hoped for. The cupcake base not too sweet or overpowering and the frosting was absolutely amazing. What really makes the frosting excellent is using good quality dark chocolate. I used Ghiradelli 60% cocoa bittersweet dark chocolate chips. These worked perfectly because they melted quickly and tasted delicious. Because the frosting did not have much added sugar, I wanted to use a dark chocolate that was sweet enough on its own and not too bitter. Also, the bold flavor of the instant coffee added hints of rich espresso to the frosting. The original recipe had called for unsalted butter but all I had in the house was Smart Balance butter. This worked perfectly and had a much lower saturated fat content than regular butter so you feel less guilty. Also, I felt as though a little salt in the butter really enhanced the flavor of the dark chocolate (think Starbuck’s Salted Caramel Mocha minus the caramel, yum!). This recipe made 14 cupcakes and was very easy and quick. Bake some for a New Year’s gathering for family or friends and your cupcakes will be talked about for the entirety of 2012, they are that good. Happy baking and Happy New Year’s!!
--Monica Purmalek
Friday, December 30, 2011
Dark Chocolate Espresso Cupcakes: Chocolate Paradise
Thursday, December 29, 2011
How Lucky Old Souls Became “McDonalds for the Mount Airy and Chestnut Hill set”

No food truck has drummed up more hype lately than Lucky Old Souls, the locavore burger-joint-on-wheels from jazz promoter Matt Feldman. We sat down with Feldman to discuss the music-food connection, his methods for local sourcing, and the wacky menu specials that have made his truck stand out from the crowd.
You’ve been performing and promoting jazz under the “Lucky Old Souls” moniker for years, and you chose to attach that name to this endeavor too. How exactly does a jazz show translate to a burger truck?
I have two main passions in life: music and food, and my interests in both of them focus on avoiding things that are mass produced, in favor of things that are genuine and heartfelt. To me, they really go together; I support local musicians, and I support local farmers. It might seem like an odd pairing, but it’s truly how I live.
I’ve had long-term plans to open a jazz club, and for various reasons, that hasn’t happened yet. I saw the truck as a way to spread the word about shows I promote and about jazz in Philly in general. If and when the club does open, the truck will be a mobile ambassador for it. As for the burgers, it bothered me that there was no place in Philly to get a relatively inexpensive, take-out burger made with good beef—that is, local, grass-fed beef. I have a family, and that’s the way we eat, and the only way to get anything like that would be to go to a bar.
Once you figured out that a burger truck was the right thing to pursue, how did you know what first steps to take? Like, where does one even buy a food truck?
I didn’t go about it in a particularly methodical or premeditated way. I had this idea in the spring, and my wife and I discussed it, and we decided that it was a good idea but—for personal reasons, mostly—not the right time to do it. Fast forward to the end of July, and I saw that the Renaissance Sausage truck was for sale. [Don’t worry, it's still around on new rolling stock – ed.] I was familiar with it, just as a customer, and it seemed like the price was very reasonable. I did some quick research to verify that my initial reaction was right, and it turned out it was a good price. That same day I saw it was for sale, I called the owner, went and saw it, and put a deposit on it. A few days later, we closed on it, and by the beginning of August, the truck was mine.

Around then, my wife and I started working on recipes. Most of them were based on ingredients we used at home. The beef, for example, comes from Rineer Family Farm, and we’ve been using their beef at home for at least two years—they sell at a couple of local farmers markets. I did try some other local farms’ beef to do my due diligence, but we still ended up going with Rineer. Same thing for the rolls, which are from Wild Flour Bakery—we’d been using those at home for a while.
Your specials—which can be really out there—seem to be the biggest thing setting LOS apart. What’s the process for creating them?
It’s not all that systematic. Something comes to me, I try it out, I taste it, and then I have some people taste it. If we think it’s pretty good, we go with it. Generally it starts with me looking at what’s available from the farms and thinking, “What sounds like fun to play with? What can I do with this?”
What are some of the most popular combinations you’ve offered so far?
We’ve been running a special that’s been really popular with collard greens, because they’re so available this time of year. I cook the greens with bacon (which I cure and smoke myself), and thought one day, “That might be good on a burger.” I tried it once, and it was.
Another thing that’s been really popular that, I’ll be honest, took me by surprise, is the smoked poblano mayonnaise. One of my purveyors had poblanos that were pretty cheap, and I honestly didn’t even know what I was going to do with them. I threw a few into the smoker that I use for my bacon, then I pureed them into homemade mayo, and I liked it so much I ended up not even adding anything else.
Other things are just happenstance. With the maple-black pepper shake, for instance, I had bought a whole big case of syrup for my bacon cure, because it was at a good price. I was talking with one of my employees, and he said, “Let’s do a milkshake with it.” At first, that sounded too sweet, but then I immediately thought of black pepper. To me, those are two things that just naturally go together—they’re both in my bacon cure, for one.
The ginger spice milkshake we’re doing now took a while to get right. It was never gingery enough, so I ended up making fresh ginger tea, then straining the ginger out and putting the tea in the shake.
What’s next?
Our next special starts Thursday. It’s going to have sliced apple, homemade mustard, Swiss cheese, bacon, and caramelized onions. I’ve known for a while that I wanted to do something with apple, and last week my wife was eating apple, sausage, mustard, and cheese as a snack, and I thought, “Oh, maybe we should try that on a burger.” We tried one right then and there, and it was great.

Most of these sound at least somewhat reasonable, but how’d you come to pair blueberry jam with habañero cheddar?
That’s a combination you can get on our breakfast sandwich and breakfast burger, and for me, sweet, savory, and spicy are the flavors of breakfast. Every time I go out for brunch, I always have the dilemma: do I get sweet, or do I get savory? In fact, my ideal brunch is when I’m with someone else and we can share one of each. I love getting pancakes, eggs, and potatoes, then putting hot sauce on the potatoes and syrup on the pancakes—to me they just counter each other very well.
You’ve tried locations all over the city. How do they vary in terms of customer preferences?
Depending on location, people are more or less likely to “get” something like the breakfast burger. When I was at the Punk Rock Flea Market, people really got it, and told me, “man, this works together.”
Love Park during the week is mostly office workers, on the lunch rush. Clark Park on a Sunday is more relaxed. We go up to Chestnut Hill on Saturdays to do a farmers market, and there we get a lot of families. We’ll have fathers come and get six burgers to bring home to the family, and that’s something we don’t see anywhere else. We’re like McDonalds for the Mount Airy and Chestnut Hill set, who appreciate grass-fed beef and want their children to be eating that kind of meat.
We also tried a Wednesday stop last week at 33rd and Arch, and there’s a good chance we’ll be adding that as regular Wednesday stop sometime early in the New Year.
What else is on the horizon for LOS—both as a truck and as a jazz organization?
Well, I have to keep reminding myself that we started at the end of the nice weather, so as well as we’re doing now, spring and summer are going to be even better. Plus once spring hits, there are a lot of different possibilities for ingredients.
As far as other LOS stuff, we’re still doing a concert series, and we’ll see what happens with the club. Certainly I can’t be on the truck every day forever, but as far as when and how that change will be made, I don’t know yet.
--Alex Marcus~Tweet
Wednesday, December 28, 2011
Latkes and Brownie Pudding: It's Hanukkah Time

(Yes, I painted this menorah. No, I'm not a fine arts major.)
Unfortunately for various Jewish clubs on campus, Hanukkah fell during winter break this year. Fortunately for me, this signified eight homemade meals, a welcome respite from dining halls. To commemorate the third night of Hanukkah, my family invited my close friend’s family for a festive dinner. My Greek friend and her family took their maiden Hanukkah voyage. While my dad produced the excellent spice rubbed chicken main course, my sister, cousin and I took the lead on dessert and the Hanukkah staple of latkes.
First, we made dessert. We have two ovens in my house, but the dessert we chose bakes for an hour so we wanted to clear the space for other items (keeping latkes warm and roasting chickens).
One of my favorite Food Network personalities is Ina Garten. Watching her show is so calming, and she and Jeffrey are adorable. I would love to attend a dinner party at her beautiful Hamptons house. Several years ago, I saw her make brownie pudding and had to try it. Well, let’s just say this was not our first time preparing it (and it always gets rave reviews).
Here’s the recipe from Ina Garten and Food Network with my notes in bold:
Brownie Pudding
Ingredients:
1/2 pound (2 sticks) unsalted butter, plus extra for buttering the dish (melt this when you begin so it has time to cool)
4 extra-large eggs, at room temperature
2 cups sugar
3/4 cup good cocoa powder (Ina always asks for good ingredients, just get unsweetened. I like Trader Joe’s brand)
1/2 cup all-purpose flour
Seeds scraped from 1 vanilla bean (Cut the vanilla bean in half lengthwise and scrape the seeds out using a knife going in one direction. You may have to do it twice to get most of them out. You should get a little pile of seeds. Vanilla beans are expensive so you can substitute vanilla extract)
1 tablespoon framboise liqueur, optional (I never use this)
Vanilla ice cream, for serving
Directions:
Preheat the oven to 325 degrees F. Lightly butter a 2-quart (9 by 12 by 2-inch) oval baking dish. Melt the 1/2 pound of butter and set aside to cool.

(Don't forget to sift; cocoa powder can be lumpy.)
In the bowl of an electric mixer fitted with the paddle attachment, beat the eggs and sugar on medium-high speed for 5 to 10 minutes, until very thick and light yellow. Meanwhile, sift the cocoa powder and flour together and set aside.

(Action shot.)
When the egg and sugar mixture is ready, reduce the speed to low and add the vanilla seeds, framboise, if using, and the cocoa powder and flour mixture. Mix only until combined. With mixer still on low, slowly pour in the cooled butter and mix again just until combined.

(Our two pan set up (mix and match your own pans).)

(How good does that look? The batter's delicious (but you didn't hear that here).)
Pour the brownie mixture into the prepared dish and place it in a larger baking pan. Look around your cabinets to find two pans that fit together. We use a normal cake pan inside a roasting pan (you want something kind of deep for the water). Add enough of the hottest tap water to the pan to come halfway up the side of the dish and bake for exactly 1 hour. Pouring the hot water can be tricky, but it’s much easier if you use a liquid measuring cup that’s easy to pour from. I tried to use a mug once and water spilled everywhere. A cake tester inserted 2 inches from the side will come out 3/4 clean. The center will appear very under-baked; this dessert is between a brownie and a pudding, a.k.a. it’s very delicious.
Allow to cool and serve with vanilla ice cream.
As the brownie pudding baked, we moved on to latkes. Potato latkes are eaten on Hanukkah to remember the miracle of the oil (oil that was supposed to last for one day lasted for eight). This year we made three types of latkes: zucchini, sweet potato, and the classic potato. The formula varies slightly for each variety. We made each batter before we started cooking to save time, grating the main vegetable with a grater attachment in the food processor, which sped everything up. Cooking latkes gets very hot and smoky, so we made them and placed them in the oven on “keep warm” so we could air out the house before our guests arrived.
I got the recipe for zucchini latkes from one of my favorite food blogs, smitten kitchen. She posted it in August, but that’s not important. You can read about it (and see her gorgeous photos here).
Here’s the recipe, again with notes in bold:
Zucchini Fritters
Adapted a bit from Simply Recipes
Yield: About 10 2 1/2 inch fritters (we doubled this)
Ingredients:
1 pound (about 2 medium) zucchini
1 teaspoon coarse or Kosher salt, plus extra to taste
2 scallions, split lengthwise and sliced thin
1 large egg, lightly beaten
Freshly ground black pepper
1/2 cup all-purpose flour
1/2 teaspoon baking powder
Olive or another oil of your choice, for frying
To serve (optional) (highly recommend this topping. We served it with all three latkes)
1 cup sour cream or plain, full-fat yogurt
1 to 2 tablespoon lemon juice (This is about a half a lemon. Save the other half to keep the potatoes from browning later)
1/4 teaspoon lemon zest
Pinches of salt
1 small minced or crushed clove of garlic
Directions:
Preheat oven to 200 degrees. Have a baking sheet ready.

Trim ends off zucchini and grate them either on the large holes of a box grater or, if you have one, using the shredding blade of a food processor. The latter is my favorite as I’m convinced it creates the coarsest and most rope-like strands and frankly, I like my fritters to look like mops.
In a large bowl, toss zucchini with 1 teaspoon coarse salt and set aside for 10 minutes. Wring out the zucchini in one of the following ways: pressing it against the holes of a colander with a wooden spoon to extract the water, squeezing out small handfuls at a time, or wrapping it up in a clean dishtowel or piece of cheese cloth and wringing away. You’ll be shocked (I was!) by the amount of liquid you’ll lose, but this is a good thing as it will save the fritters from sogginess. (Wringing out AS MUCH LIQUID AS POSSIBLE is essential to make any type of latke crispy.)
Return deflated mass of zucchini shreds to bowl. Taste and if you think it could benefit from more salt (most rinses down the drain), add a little bit more; we found 1/4 teaspoon more just right. Stir in scallions, egg and some freshly ground black pepper. In a tiny dish, stir together flour and baking powder, then stir the mixture into the zucchini batter.

In a large heavy skillet — cast iron is dreamy here — heat 2 tablespoons of oil over medium-high heat until shimmering. Drop small bunches of the zucchini mixture onto the skillet only a few at a time so they don’t become crowded and lightly nudge them flatter with the back of your spatula. Cook the fritters over moderately high heat until the edges underneath are golden, about 3 to 4 minutes. If you find this happening too quickly, reduce the heat to medium. Flip the fritters and fry them on the other side until browned underneath again, about 2 to 3 minutes more. Drain briefly on paper towels then transfer to baking sheet and then into the warm oven until needed. Repeat process, keeping the pan well-oiled, with remaining batter. I like to make sure that the fritters have at least 10 minutes in the oven to finish setting and getting extra crisp.

(Zesting up some sour cream.)
For the topping, if using, stir together the sour cream, lemon juice, zest, salt and garlic and adjust the flavors to your taste. Dollop on each fritter before serving. We sprinkled some paprika on top to differentiate the jazzed up sour cream from regular. It also added a nice color. These fritters are also delicious with a poached or fried egg on top, trust me.
Do ahead: These fritters keep well, either chilled in the fridge for the better part of a week and or frozen in a well-sealed package for months. When you’re ready to use them, simply spread them out on a tray in a 325 degree oven until they’re hot and crisp again.

(The final toppings result!)
Zucchini batter done, we moved to the potato and sweet potato versions, once again using our grater attachment for the food processor. I remember grating potatoes by hand for latkes when I was younger and let me tell you, it takes forever. My dad always jokes that that version includes some skin (and he’s not talking about potato skin).
Our recipe for latkes comes from Jewish Family Celebrations: The Sabbath, Festivals, and Ceremonies. We make "Aunt Tissy’s Latkes," found on page 98, notes in bold:
Aunt Tissy’s Latkes
Yield: ~12 latkes
Ingredients:
6 potatoes (we used the same recipe for sweet potatoes)
1 onion
2 eggs, beaten
¼ teaspoon baking powder
¼ teaspoon pepper
½ teaspoon salt
3 teaspoons flour (to thicken)
oil (You’ll need a lot)
Directions:

(Sweet potatoes nearly ready to fry.)
Peel and grate the potatoes and onion. Add the beaten eggs to the grated vegetables. Add the rest of the ingredients except the oil and mix well. Drop by tablespoons onto hot oil. Shape the potato mixture into round, flat pancakes. In hot oil, fry on both sides a few at a time until they are crisp. Drain well on paper towels. (We put them in the oven on keep warm in paper towel-lined cookie sheets.)

(Latkes frying away.)
Batters made, we got to frying. You need to watch the latkes and use oil liberally. It gets smoky and hot, but the result is worth it.

(The "Latke" spatula was a Hanukkah gift this year.)
When we sat down to dinner, we tasted the sweetness of the sweet potatoes, the crispness of the potatoes and the freshness of the zucchini, topped with sour cream or applesauce. Latkes are a tad labor intensive so they tend to be annual food. Making different types is time consuming but oh so worth it. (And there’s no law declaring them an exclusively Hanukkah food; make latkes in March, why not).

(A decadent red velvet cake.)

(The finished brownie pudding!)
No one had any complaints about the rich chocolaty dessert (or the red velvet cake our guests brought). Brownie pudding had a flaky crust and a creamy chocolate interior. As Ina often says, “How bad can that be?”
Our Hanukkah feast was satisfying and delicious. A mix of new and old recipes combined into the perfect winter spread. We also may have gained about five pounds.
--
Tuesday, December 27, 2011
Aztec Hot Chocolate Cupcakes
 There is nothing better than spicy, rich hot chocolate, often called Aztec hot chocolate. Except for maybe cupcakes. Therefore, when I stumbled upon this recipe for hot chocolate cupcakes, I just knew I had to try an Aztec version. The result was the richest, most chocolatey cupcakes I had ever tasted, with a molten center, just like thick European hot chocolate. The cayenne pepper and cinnamon I added gave each bite a nice spicy kick.
I made a gluten-free version, by substituting the flour in the recipe with the all-purpose gluten-free flour mix at the Gluten-Free Girl blog. I'm sure the recipe is just fine with regular all-purpose flour however.
Ingredients
6 oz extra dark chocolate, chopped into pieces (I used Green & Black's 85% chocolate bar)
2 tbsp unsalted butter
1/2 cup sugar
2 large eggs
2 egg yolks
1/2 cup all-purpose flour
1 tsp cinnamon
1/2 tsp cayenne pepper
whipped cream
more cinnamon, for sprinkling on top
Directions
1. Line a muffin pan with 12 muffin papers.
2. In a small saucepan, melt the butter and chocolate together over low heat until smooth. Set aside.
3. Beat the sugar, eggs and egg yolks together, until a thick ribbon falls from your whisk. I did this by hand, and it took over 10 minutes. (My arm started burning after the first minute!) If you have an electric beater, lucky you, this step will be a lot easier. If not, persevere. I did it and so can you!
4. Mix cinnamon and cayenne into the flour, and then sift it all over the egg and sugar mixture. Using a spatula, gently fold the flour into the egg, so that it doesn't loose its fluffiness.
5. Gently pour the molten chocolate on top of the mixture, and once more use a spatula to gently fold it all together.
6. Pour the batter into the muffin papers, and refrigerate for over an hour. When you are ready to bake the cupcakes, preheat the oven to 400 degrees.
7. Bake the cupcakes for around 7 minutes. You want the outsides cracked and the insides moist and gooey.
8. Serve warm, with whipped cream for frosting and cinnamon sprinkled on top.
-Elliott
Monday, December 26, 2011
An Even Jewisher Christmas at Zahav!
As a special holiday splurge, I decided to treat myself to "An Even Jewisher Christmas" at Zahav -- a special event featuring a surprise film and Michael Solomonov's take on Chinese food.

As soon as I walked in the door (30 minutes early as requested), I was greeted by servers dressed up in kitschy red t-shirts, and by the smell of, well, burning popcorn. With the staff working furiously to re-set the old school popcorn popper, a number of us waited patiently (ever so patiently) to be seated.
After 30 minutes of semi-starvation, I was taken to a table at the front of the house, right by the projector and the makeshift screen. Not a bad seat, if I do say so myself. Plus, they didn't make me sit with random strangers. Brownie points -- check.
As we all waited for the movie to start, servers brought out little brown paper bags of seasoned popcorn to tide us over until the main courses came out. (It would've been lovely to try one of several Chinese-themed cocktails, but I doubt my alcohol allergy would've agreed with me.)

The movie of the night turned out to be (drumroll, please) Big Trouble in Little China. Starring Kurt Russell and Kim Cattrall in their early days, this was definitely not something I would've chosen for myself. That said, it was the perfect flick for this setting. Campy, kitschy, and all-around ridiculous. Brilliant pick.
To kick things off, servers brought out the shrimp salad -- which I considered to be a lighter version of the traditional walnut shrimp dish. Here, the shrimp was less battered, the sauce was less rich, and everything was placed nicely atop a crunchy (non-green) salad, which had a bit of acid that cut through the cream.

Next up was one of my favorite dishes of the night -- the Szechuan-style pork belly. While I could've done without the bitter greens and the useless carrots, the pork belly was perfect in all of its unctuousness. Sliced thin like bacon, I could've lived off this dish alone.

Considering that I normally don't eat much red meat, the veal dumplings were probably the heaviest items of the night. The skins on the dumplings were lovely and smooth though, which made up for the slight grittiness of the filling. The harissa oil added a bit of heat, which was balanced by the chill of the diced cucumber.
At this point, I was already starting to feel sated, yet I still had four more courses to go. I did what I could to power through, but I definitely realized that eating solo at some events is nearly impossible, especially if I actually want to enjoy what I'm taking into my body. Oh, the trials and tribulations of single-dom.

With sweetbreads being one of my favorite things to eat, I was sad that this dish didn't come out earlier, especially since my stomach was shrinking furiously. That said, I wasn't too pleased with the dish as a whole, so perhaps everything worked out for the best.
The exterior of the salt and pepper sweetbreads was definitely more breaded than usual, and the interior was quite mealy. I'm also (shockingly) not a fan of lo mein or water chestnuts, so I essentially picked off the protein and left the carbs and veggies untouched.

Like every meal I had growing up, which had to have at least one big dish of greens, Chinese broccoli arrived at the table, topped with shreds of smoked mackerel. Being used to having greens served au naturel, I wasn't quite sure what to make of the fish/veggie combination. Ultimately, I don't think the combination of textures worked very well.

Even with no appetite left, there was no way that I was leaving without finishing the entire plate of moo shu duck set before me. Not only did this dish look absolutely breathtaking, but the flavors and textures were more than spectacular.
While moo shu pork is fairly ubiquitous in the Chinese takeout world, moo shu duck is rare, if not non-existent. This preparation appears to have been a cross between moo shu pork and Peking duck, given that tortilla-like pancakes and white rice were brought out as accompaniments.
Although the meat was a bit salty, it was also tender, moist, and flavorful. In addition, red chilis and green onions added both heat and color. From the looks of it, I really shouldn't have been able to finish everything on the plate. That said, where there's a will, there's a way.

The way being that I barely touched the white chocolate cake at the end of the meal. As one friend indicated, that was pretty much sacrilege given my love of sugar. At the very least, I made it through the tiny scoop of mandarin orange sorbet. The rest of the cake was a bit too dense, and the berry sauce was a bit too sweet.

All in all, this was a delicious experience. The food was creative and flavorful, and the service was excellent. I couldn't believe how many times I had to fend off water and rice, but I certainly didn't find the attention excessive. Plus, I was greeted by Michael at the beginning and end of the meal, which was very considerate and certainly gracious.
Zahav continues to be one of my favorites, and special events like this that showcase Michael's culinary breadth are definitely not to be missed.
Zahav
237 St. James Place
Philadelphia, Pennsylvania
215.625.8800Tweet
Tuesday, December 20, 2011
"Penn-e" Pasta for Finals Crunch Time
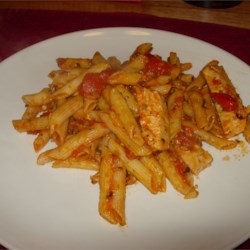
During finals period, most of my cooking falls by the wayside as I turn instead to cereal, cheese, crackers and take-out. I tell myself that grocery shopping and cooking take too long, and sometimes this is true. However, if you find yourself with a lull in your tests or need a reason to procrastinate studying, this recipe is a great one. It yields a delicious meal with a mouthwatering sauce that even tomato sauce novices can successfully produce. It is tasty and filling and will provide plenty of leftovers to carry you for at least a day. (See? You're saving time already!) There is also the added benefit of cooking providing a productive form of relaxation- you get a nice break for your brain and create something that is edible in the process. Without further ado (I too have studying that I should probably be doing), I present said recipe:
Ingredients
1/2 Cup olive oil, divided
6 cloves garlic, minced
1 teaspoon red pepper flakes (can be more or less, depending on desired spiciness)
1 (28 ounce) can diced tomatoes with garlic
1/2 cup tomato sauce
1 bunch fresh basil, chopped
1 (12 ounce) package dried Penne pasta
2 eggs
1 teaspoon garlic powder
1 teaspoon salt
1 teaspoon pepper
1 pound thin chicken breast cutlets
Directions
1. Heat 1/4 cup olive oil in a large skillet over medium heat. Add the garlic and saute for a few minutes. Next add red pepper flakes, and saute for one more minute. Pour in diced tomatoes and tomato sauce, and add basil. Reduce heat and simmer for 20 minutes, stirring occasionally.
2. Meanwhile, bring a large pot of water to a boil. Add Penne pasta and cook according to package directions. Drain.
3. In a small bowl, whisk eggs. Place breadcrumbs in a separate bowl and mix in garlic powder, salt and pepper. Dip chicken cutlets first into the egg, then press in the breadcrumbs until completely coated in both sides.
4. Heat remaining 1/4 cup olive oil in a large skillet over medium heat. Fry chicken for about 5 minutes per side, or until the coating has turned a nice golden-brown to dark brown color.
5. Remove chicken and slice. Toss chicken slices with sauce, and let simmer for 10 more minutes. Serve sauce over Penne pasta and enjoy!
Monday, December 19, 2011
So Sweet a Snapshot
 What happens when you combine an artist's eye with a gastrophile's love of chocolate? Bars of chocolate that look like old-school Polaroid photos, of course! Former artist-turned-cake-decorator-turned-chocolate entrepreneur Rae Vitorelli recently launched her new initiative, Cocoagraph. I stopped to chat with her at HyLo Boutique's holiday fête, showcasing ten of Philadelphia's best artisans.
Rae prints an edible photo on top of every Cocoagraph chocolate bar. Although she has already created a set of generic bars, ranging from photos of adorable owls to jolly old Saint Nick, she can also create customized bars of any photo sent to her. Consequently, Cocoagraphs make the perfect gift as a way of sharing an (edible) treasured moment with a friend.
Cocoagraph chocolate bars are available in white, milk and dark varieties. The chocolate comes from the family-operated Santa Barbara Chocolate Company, which prides itself in its ethical trading practices. From my sampling I can assure you that not only is their chocolate fair-trade, it is also quite yummy.
More information on Cocoagraph is available at the Cocoagraph website. You can order Cocoagraph chocolates from Rae's Etsy store front.
-Elliott
Thursday, December 15, 2011
Food Events @ Penn
 Meritage Foie Gras Tasting Menu
What: Check Chef Anne Coll's latest five-course tasting menu at Meritage! From an amuse bouche of Foie Gras Mousse with pomegrante molasses and pickled apple with toasted brioche to Crispy Duck Confit (accompanied by a cured spiced torchon of foie gras, curried lentils, pineapple and kumquat chutney and a port wine reduction) to Peanut butter and Foie Gras Mousse (with dark chocolate and currant jam sauce), your taste buds are sure to thank you. See the full menu here and make reservations here.
Where: 500 S. 20th Street
When: now until Friday, December 16
Cost: $39
 Zahav Holiday Celebrations
What: Zahav is hosting three special dinner events for the holiday season, each with a festive prix fixe menu. Start with Chanukah (Tuesday, December 20 until Wednesday, December 28) ($45), where you can enjoy classic fare such as Hummus with Glazed Brisket, served with house-made laffa and a selection of salatim; a selection of Latkes; and Sufganiyot with dates and orange. "A Very Jewish Christmas” features Israeli-inflected Chinese food, movies shown on a big screen, and hot buttered popcorn. Screenings of the to-be-determined movies (make your movie request via Twitter!) will be at 6 and 9 pm. On New Year’s Eve, the restaurant will serve a spectacular four-course dinner with menu highlights including Glazed Veal Shanks with saffron, apples and cinnamon and Chocolate-Hazelnut Babka with orange-vanilla ice cream. Check out more info here.
Where: The rotunda at the Shops at Liberty Place
When: Chanukah- Tuesday, December 20 until Wednesday, December 28; "A Very Jewish Christmas”- Thursday, December 22; New Year's Eve- Saturday, December 31
Cost: Chanukah- $45; "A Very Jewish Christmas”- $50 ($100 with bottle of Johnnie Walker Black for the table, additional $9 each for Chinese-inspired cocktails); New Year's Eve- $65 ($100 with drink pairings)
 Complimentary Brunch for Toy Drive Donors
What: In the true spirit of the season, Le Castagne Ristorante is offering its customers a complimentary Sunday brunch entrée in return for donating a new unwrapped toy for charity. Toys go to the 23rd annual CBS-3 Joy of Sharing Campaign, which has provided thousands of holiday toys to underprivileged children throughout Philadelphia and benefits The Salvation Army, The Children’s Hospital of Philadelphia and Children’s Crisis Treatment Center. Eligible Sundays for the complimentary brunch entrée offer are December 11 and 18. Enjoy delectable offerings like Brioche french toast stuffed with Nutella & finished with dark rum & caramelized banana; and apple glazed braised pork sandwich. Reservations are not required.
Where: 1920 Chestnut Street
When: Sunday, December 18, 11 am-2 pm
Cost: One unwrapped toy per guest
 Sabrina's Cafe Breakfast Deal
What: All three Sabrina's Cafes, included the newly opened University City location, will be offering a special of any of four breakfasts and a cup of coffee for only $6.99. The breakfasts offered are Two Eggs Any Style plus your choice of a breakfast meat and toast, Short Stack Buttermilk Pancakes, Challah Frenchtoast or Pigs in a Blanket.
Where: Any Sabrina's Cafe
When: Weekdays, 8-10 am, through December and possibly into January
Cost: $6.99
Monday, December 12, 2011
Federal Donuts - Fried Chicken & Hot Donuts: What's Not to Love?
 As a special belated birthday treat, my friend Erich and I took an impromptu foodie trek over to Federal Donuts, a little outpost of deliciousness in South Philly. While I'd been keeping tabs on Michael Solomonov's newest co-owned venture ever since its opening two months ago, I'd been waiting for the right moment to pounce.
Due to the speed with which the donuts (available at 7 AM daily) and the fried chicken (available at noon daily) disappear, pouncing (and planning) is by all means necessary. Well, generally, that is. This particular time, we decided last-minute to check out Federal Donuts for Saturday brunch. And with serendipitously impeccable timing, we showed up at approximately 11:55AM.
After thanking Erich for expeditious parking, we dodged in front of an older couple walking towards the entrance to the corner store front. (No one gets in the way of me and my brunch!) And I couldn't have been happier to enter a warm room permeated by smells of fried chicken, hot donuts, sugar, and spices.The space was indeed small, with the majority of the room taken up by fryers, trays, carts, and a wraparound counter.
With only a few seats available, the set-up is definitely meant for take-out service. While I wasn't quite sure what to do when we walked in, we made our way to the counter to grab our numbers for our half chicken orders. Word on the street is that there are only so many chickens fried each day, so if you don't make it in time to grab a number, you're essentially out of luck. Happily, we'd arrived in time to be 41st and 42nd in line.
 While we waited, we checked out the minimalist menu overhead, and made some key decisions on how we wanted our chicken finished off, what donuts to pick up, and which beverage to pair with our savory and sweet treats. We also had the opportunity to sample various donuts that the staff cut up for all of their patiently waiting customers. Erich was good (and strong) enough to restrain himself -- I, however, demonstrated absolutely no self-control. Yummy yummy donuts.... Nom nom nom....
When our numbers were called, Erich chose the Za'atar Crispy finish on his chicken, along with a combination of Fresh and Fancy donuts. With my sweet tooth, I went with the Honey-Ginger Glazed finish on my chicken, along with the Vanilla-Lavender, Key Lime, and Nutella-Tehina-Pomegranate donuts. Having tasted a number of donut samples, I have to admit that I found most of the Fancy ones way too sweet. And given my general love of sugar, that's saying a lot.
To top off my take-out meal, I went with a Dr. Brown's celery soda. Given that I'm not a big fan of soda, I was essentially choosing something that I'd never heard of nor tasted before. With his Dr. Brown's root beer in hand, Erich collected our semi-greasy white paper bags, and we made our way out of South Philly, in search of the perfect spot to dive into our fried chicken and donuts.
 We quickly found our way to Fitler Park in Fitler Square, and made a beeline for a park bench in the sun. As soon as we opened our bags, we realized that the restaurant had given us each a free Fresh donut! Setting those aside for dessert, we focused our attention on the task at hand -- getting through a half chicken without creating a greasy mess.
As neither of us chose to share (shocking), I can only comment on my order. That said, I was more than satisfied. The chicken was crispy without being shiny, and the fact that it wasn't entirely covered in batter was actually quite pleasant. (I really hate the feeling of eating equal parts meat and batter.) The glaze was both savory and sweet, and the stickiness contrasted nicely with the crispness.
I had no trouble finishing my entire order, though I must say that the chicken breast was my least favorite piece, being quite dry and stringy. It seemed like it'd been left in the fryer just a few seconds too long. On the other hand, the free Fresh donut was my first experience with a truly phenomenal cake donut. While I'm still very much committed to my beloved Krispy Kremes, I definitely have a new-found appreciation for the cake donut. The celery soda was also surprisingly amazing, and washed down everything quite nicely.
By some miracle, I was able to save my other three donuts for several days -- before promptly inhaling them all in one sitting. As expected, the Key Lime was, like the other Fancy donuts, way too sweet. The Nutella-Tehina-Pomegranate was slightly better, and not as overwhelmingly saccharine. The Vanilla-Lavender, like the free Fresh donut, was another perfect cake donut. (By the way, I ate them all too quickly to have photos of them. *Sigh*)
Given that Erich polished off his chicken almost as quickly as I did, I suppose he liked the Za'atar as much as I liked the Honey-Ginger. He also seemed to prefer the Fresh donuts over the Fancy ones, which were scrumptious in their simplicity. And not only was the food delicious, but affordable as well. With the Fresh and Fancy donuts costing $1.25 and $2, respectively, and the half chicken costing only $9, I'd choose FD over KFC any ole day. All in all, this was a wonderful foodie experience, and I can't wait to come back for more. Now I just need to make sure and time my visit to a tee....
Federal Donuts
1219 S. 2nd Street
Philadelphia, PA 19147
267.687.8258
Friday, December 9, 2011
A Christmas Tradition: Candy Cane Cookies
The holiday season- a time that embraces the smell of pine, the crispness of a winter breeze, the comfort of hot chocolate by a fire, the sight of a brightly lit tree, the melodious sounds of carolers, and the taste of candy cane cookies of course!
Every year, my friends and I come together during the holidays to bake this delicious treat. Although this dessert requires more effort to make than your typical slice-and-bake cookies, the end result is worth the extra exertion.
The hardest part of making these cookies is rolling the dough ropes into a shape of a candy cane. My friends and I found it was easier to twist the dough into straight “canes” rather than actual canes that bend. We also got creative and began to make twisted candy cane hearts amongst other figures. We had a lot of fun while making these cookies, and I encourage you to enjoy the process as much as we did by listening to Christmas music, wearing cute aprons (if you’re a girl), drinking sparkling cider, and just enjoying the company of your friends!

Ingredients
1/4 cup shortening
1/2 cup butter or margarine
1 cup powdered sugar
1 egg, slightly beaten
1 tsp almond extract
1 tsp vanilla extract
2 1/2 cups all-purpose flour
1/2 tsp salt
1/2 tsp red food coloring
1/3 cup finely crushed peppermint candy canes
1/3 cup sugar
1 package mini candy canes
Directions
1. Cream shortening and butter in a large mixing bowl until the mixture is fluffy.
2. Add the following ingredients and mix well: powdered sugar, egg, almond extract, vanilla extract, all-purpose flour, and salt.
3. Divide the dough equally into two separate piles.
4. Choose one of the piles and add red food coloring to it. Make sure you the dye is evenly spread throughout the dough.
5. On a lightly floured surface, role a teaspoonful of each type of dough (plain and red) into 4 ½” long ropes.
6. After rolling out all of the dough, carefully twist a red rope and a white rope into the shape of a candy cane.
7. Repeat procedure with the remaining dough.
8. Put cookies on an ungreased cookie sheet and bake for 9 minutes or just until the edges begin to brown.
9. For the candy cane sugared topping, open up the package of mini candy canes and begin to break them apart.
10. Put the candy cane pieces into a food processor and grind them until they form a fine solid powder that resembles sugar.
11. Add sugar to the mixture of crushed candy canes.
12. When the cookies are done baking, immediately remove them from the oven and sprinkle them with the candy mixture.
Enjoy! But don’t forget to share with your friends and family!
-Carissa Gilbert