Showing posts with label Recipes. Show all posts

Friday, February 8, 2013

Schokoladnaya kartoshka: The Humble Russian Dessert

     The subject line of the email from the editor of Penn Appetit read simply “Dessert Competition Saturday!” Relishing any opportunity to bake, I didn’t need any further convincing to enter the contest. Reading on, I discovered the judging criteria to be taste, appearance, and creativity. Although I wasn’t hoping or even trying to win, I’m a naturally competitive person (insert Wharton joke here) and so thought that my creativity could help differentiate me from the others. Namely, I was certain that if I made a Russian dessert, there would be little chance that anyone else would think to make the same thing.

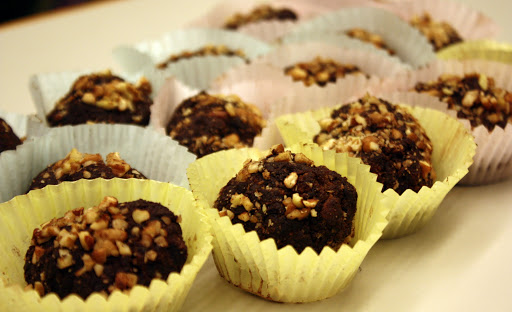
Schokoladnaya kartoshka. Photo courtesy of Penn Gastronomy Club 
      I tried to think of my favorite Russian sweet that my mom and grandmother had baked me. The scharlotka, an apple cake, came to mind, as did the Napoleon, the Russian version a creamier and moister variation of the French classic. But these two desserts, although beloved by me, seemed to be too ‘classic’ and not quite interesting enough for the competition. I thought back to the almost dozen summers I spent living with my grandparents in their home in Russia. When I accompanied my grandmother on her weekly grocery shopping excursions, we would walk all around the city visiting various different shops - the butcher, the open-air vegetable market, a vendor selling canned goods, the fish store, and finally the bakery. At the bakery she would buy us a couple loaves of the traditional dense black rye bread, and if I was lucky, she would also buy me a sweet treat or two. Whenever she succumbed to my begging and pleading, my first choice would always be the schokoladnaya kartoshka, or chocolate potato.

     This dense, rich, and intensely chocolaty pastry doesn’t have any potato in it but is shaped to look like one, with nuts poking out to look like its sprouts. The walk home always seemed excruciating long, as I couldn’t wait to dig into my dessert. Sitting in my grandmother’s tiny kitchen, in between sips of black tea, I would enjoy spoonfuls of the moist chocolate ‘potato.’ I haven’t eaten this uniquely Russian dish for years, since the last time I was in Russia was more than 4 years ago. I decided the dessert competition would be the perfect opportunity, or excuse, to attempt to recreate my favorite childhood dessert.

     Following a few internet searches, I found that the ‘potato’ was made rather simply: chocolate icing mixed with cake crumbs. Excited that I stood a fairly good chance of accurately recreating this childhood memory, I bought the necessary ingredients and set about baking. Although I ALWAYS bake my cakes from scratch, since the recipe called merely for cake crumbs, I decided to use a store-bought package of yellow sponge cake mix. I wanted the ‘potato’ to have an intense chocolate flavor, so I added a quarter cup of cacao powder to the cake mix before baking. Next, I made the chocolate icing, mixing first equal parts creamed butter and condensed milk. Finally, I added a few ounces of melted bittersweet chocolate and a couple of teaspoons of vanilla extract and mixed it all together to form the icing. Once the cake had baked and cooled, I crumbled it to form crumbs and combined it with the icing. To sculpt the finished ‘potatoes,’ I rolled several tablespoons of the cake crumb-icing mixture into balls, dusted them with cacao powder, and rolled them in chopped pecans. Finally, I was ready to taste my creations to see if they lived up to my expectations.

     Although not as dense and rich as I had remembered, my recreation of the schokoladnaya kartoshka was still satisfying, every mouthful moist and flavorful. The taste and feel of the dessert made me think back to all of those summers I spent with my grandmother, helping her on her weekly grocery expeditions. Now, I can’t wait until she comes and stays with my family again later this year, so I can share my version of this dessert with her.
                                           
My grandmother in her kitchen in Russia.


Tuesday, February 5, 2013

Chocolate Coconut Cake

Most times I've eaten cake in my life, I've been disappointed. There are so many desserts I can appreciate even when they aren't great. Take cookies. Although I would certainly prefer a phenomenal, straight from the oven Jacques Torres style cookie, I still enjoy the occasional Oreo. Cake is a different story. Bad (even mediocre) cake sucks... it just sucks. The texture is just so important yet difficult to perfect that any old slice of cake from a local grocery store is guaranteed to disappoint.

Mediocre cakes are just about the frosting. The cake itself is nothing more than an excuse to eat the frosting. I do not tolerate cakes made from box mixes, from terrible grocery store bakeries, and from anywhere else that produces cakes that may as well be frosted bread. You shouldn't either! Take a stand. Make a real cake.

I made this cake for my father's birthday over break and it rekindled my love for the classic birthday treat. The cake is so very chocolatey and the coconut filling, although it barely tasted like coconut, was excellent. The entire cake does not make for the prettiest of pictures, but trust me, as everyone who tasted it would also said: it's unbelievable.

Rich Chocolate Cake with Coconut Filling and Ganache
From Food52

Serves 10 to 12

18 ounces good quality bittersweet chocolate, divided, chopped
2/3 cups shortening
4 eggs
2 teaspoons vanilla, divided
1 1/2 cup strong black coffee
3 1/3 cups sugar, divided
3 cups cake flour
1 1/2 teaspoon baking soda
1 teaspoon salt
8 ounces softened cream cheese
1 cup unsweetened flaked coconut
1 cup heavy cream

1. Set out the cream cheese to soften. Preheat the oven to 350 degrees.
2. Grease a 10-12 cup bundt pan and dust with cocoa powder.
3. In a small saucepan, melt 8 ounces of the chocolate with the shortening. Set aside to cool slightly.
4. In a mixing bowl, combine the cream cheese with 1 egg, 1/2 teaspoon vanilla, 1/3 cup sugar and the coconut. Set aside.
5. In a large mixing bowl, combine cooled chocolate mixture, 3 eggs, 1 1/2 teaspoon vanilla, and coffee.
6. In another mixing bowl, whisk together the sugar, cake flour, soda and salt.
7. Combine dry ingredients into wet ingredients until just incorporated.
8. Pour half of the chocolate cake mixture in to the bundt pan. Top that with the coconut/cream cheese mixture and then top that with the remaining cake mixture.
9. Bake on the center rack of a 350 degree oven for 45-65 minutes or until tester comes out clean.
10. Cool the cake in the bundt pan on a wire rack for 10 mintues. Invert the cake on a serving plate to cool further.
11. While cake is cooling, bring the heavy cream to a simmer. Remove from heat and whisk in 10 ounces bittersweet chocolate until smooth. Set aside to cool.
12. Once the cake has cooled, drizzle or pour (depending on how much icing you want) the ganache on to the cake.

Thursday, January 24, 2013

Pimiento Cheese: Spice Up Your Life!

An essential Southern dish, Pimiento cheese combines sharp cheddar cheese, pimientos, and mayonnaise with a peppering of other regional ingredients, creating a delicious blend of spice and soul. From grilled cheese to fritters, this versatile cheese can be used in a range of dishes. Below are two of my favorite recipes: Relish’s Pimiento Cheese Fritters and Southern Living’s Baked Pimiento Cheese.

Southern Living’s Baked Pimiento Cheese 

• 1 1/2 cups mayonnaise 
• 1 (4-ounce) jar diced pimiento, drained 
• 1 teaspoon Worcestershire sauce 
• 1 teaspoon finely grated onion 
• 1/4 teaspoon ground red pepper 
• 1 (8-ounce) block extra-sharp Cheddar cheese, shredded 
• 1 (8-ounce) block sharp Cheddar cheese, shredded 
• Garnish: chopped parsley 

1. Stir together first 5 ingredients in a large bowl; stir in cheeses. Spoon mixture into a lightly greased 2-quart or 11- x 7-inch baking dish.
2. Bake at 350° for 20 minutes or until dip is golden and bubbly. Garnish, if desired. (*NOTE—I ended up baking my cheese for about an hour. I used an 8-inch casserole dish)


Relish’s Pimiento Cheese Fritters 
• 1 1/4 pounds cheddar cheese, grated 
• 8 ounces pepper-jack cheese, grated 
• 4 ounces cream cheese 
• 1/4 cup roasted red peppers, finely chopped 
• 1 1/2 tsp Cajun Spice 
• 1/4 cup mayonnaise 
• pinch of salt 
• 2 cups flour 
• 2 cups buttermilk 
• 4 cups panko breadcrumbs 
• 2 cups Relish's 4 Pepper Jelly 

1. In a large bowl, mix the cheddar and pepper-jack cheeses.
2. In a food processor , add the cream cheese, red peppers, Cajun spice and mayonnaise. Process until combined and there are no clumps of cream cheese.
3. Add the cream cheese mixture to the cheese and mix with a rubber spatula until combined.
4. Season with salt to taste.
5. Chill for 2 hours or overnight.
6. Scoop tablespoon size pieces of pimiento cheese and roll them into smooth balls.
7. Put the flour, buttermilk and panko breadcrumbs in three separate bowls.
8. Bread the pimiento cheese, place a ball of pimiento cheese in the flour and roll it until completely coated. Dust off the excess. Next, add the ball of pimiento cheese into the buttermilk and completely coat the cheese. Add it into the panko breadcrumbs and press the breadcrumbs into the cheese. Then repeat the buttermilk and panko breadcrumb steps (the pimiento cheese needs to be completely coated or the cheese will leak out during frying.) Continue with the pimiento cheese balls until all of them are breaded.
9. Chill for 1 hour.
10. Add 1 gallon of oil to a large pot. Place the pot over medium heat until a frying thermometer reaches 350 degrees. Fry 6 to 8 fritters at a time for about 3 to 4 minutes and they are golden brown in color. Continue frying until all of the fritters are cooked.
11. Serve the pimiento cheese fritters with the pepper jelly.


Craving more?! Try these tempting recipes


Wednesday, January 23, 2013

Chocolate Tart

Over winter break, I was lazy. At home, I can basically cook whatever comes to my mind, no matter how over the top it is or how obscure its ingredients are. This is because my parents are more willing to give me extra money for groceries when I make the food!

So, of course I was looking forward to cooking and experimenting quite a bit at home, but when I got there I realized something: I also enjoy doing nothing. Every day I was busy hanging out with my friends, and when I got a new camera for Christmas, I decided that I was going to try and make stuff that is not only delicious, but that also looks good in photographs-- and that isn't extremely difficult to make. Naturally, I began my break with a chocolate dish.

This recipe comes straight from David Lebovitz and as far as I can tell, it is perfect. It is not too difficult to make, though make sure you read the steps before you begin so you don't panic and accidentally add the eggs too early, basically making caramel scrambled eggs. Yuck. If you pay attention and make it correctly, this tart is incredibly delicious. It is also so very pretty. Take a look.

PS... I hope you guys like the new camera.


From David Lebovitz:

1 1/4 cup (250 g) sugar
6 tablespoons (90 ml) warm coffee
4 ounces (115 g) unsalted butter, cubed, at room temperature
pinch of sea salt
4 ounces (115 g) bittersweet or semisweet chocolate, chopped
2 ounces (55 g) unsweetened chocolate, chopped
2 large eggs
1/4 cup (35 g) flour
1 tablespoon dark rum or 1 teaspoon vanilla extract

One 9- or 10-inch (23 cm – 25 cm) prebaked tart shell (such as French tart dough)
1. Preheat oven to 350ºF (180ºC.)

2. Spread the sugar in an even layer in the bottom of a large, heavy-duty saucepan or Dutch oven. Cook the sugar over moderate heat until the edges liquefy and being to caramelize. Use a heatproof utensil to gently drag the liquefied sugar toward the center of the pan, encouraging the sugar to melt evenly.

3. Once the sugar is melted, it was caramelize rather quickly. When it starts to smoke, but before it burns, turn off the heat and stir in the coffee. (The mixture will bubble and seize a bit. Be sure to avert your face and you may wish to wear oven mitts.)

4. If the caramel has seized up in places, stir it gently over low heat until smooth. Then add the butter and salt, and stir until melted, then stir in both chocolates until smooth*.

5. Mix in the eggs, then the flour. Stir in the rum or vanilla extract.

6. Pour the mixture into the pre-baked tart shell, then bake for 15 to 20 minutes, just until the filling starts to rise and crack at the edges but the center is still jiggly. Do not overbake.

Remove from oven and let cool completely before slicing.

Storage: Tart will keep for up to three days at room temperature, well-wrapped.

Troubleshooting: If any bits of caramel remain after adding the butter, simply stir the mixture over very low heat until they’re all completely dissolved. If any stubborn little bits remain, you can strain the buttery caramel through a mesh sieve, before adding the chocolate.

Wednesday, December 5, 2012

Comfort Food: Chicken Pot Pie

In conjunction with Penn Appétit's comfort-food themed Fall 2012 magazine, we are featuring a few of our bloggers' favorite comfort foods, along with their cherished recipes.

Today's featured recipe is:
Chicken Pot Pie

Each of us has that one dish that evokes feelings of warmth, home and comfort. Just one bite will make you feel as if your wrapped in five warm blankets, instantly soothing your angsty soul. For me, that dish is chicken pot-pie. A hearty creamy blend of tender chicken and vegetables topped with a flaky and buttery crust makes for a meal that simply oozes coziness. Whether you’re creating comfort for one in a single bowl, or doling out relief to many, chicken potpie is a true taste of home-away-from-home.

-Amanda Shulman

The Recipe

Ingredients
4 cups chicken broth
4 chicken breasts
½ stick salted butter (4 tbs)
3 tbs flour
½ cup heavy cream
8 small potatoes, halved
1 cup baby carrots
1 vidalia onion, roughly chopped
1 cup frozen peas
salt
pepper
garlic powder
1 pre-made pie crust
1 egg, beaten

Directions
Pour the chicken broth into a large pasta pot. Put on high heat and bring to a boil. Once boiling, add the chicken breasts and turn down the heat to a simmer. Simmer, covered, for 1 hour, until the chicken is extremely tender. Remove the chicken from the broth with a slotted spoon and set aside on a plate to cool until able to handle. Shred the chicken with your hands into large hearty chunks, set aside. Keep the broth on a high simmer.
Preheat oven to 400 degrees.
In a small saucepan melt the butter. Once melted, whisk in the flour. Whisk constantly until a thick caramel colored mixture is formed. This is your roux. Once the roux is a thick sticky mixture, whisk it into the broth. Once fully mixed, add the cream, continuing to simmer. The mixture should be a milky white color and should be thick and creamy. Bring to a boil. Once boiling drop in the potatoes. After 10 minutes, they should be pretty fork tender. Bring down the heat to a simmer and add in the onions and carrots, cook for 10 more minutes. Stir in the chicken and peas. Season with salt, pepper and garlic powder to taste. Pour the entire mixture into a greased casserole dish.
Roll out the pie crust and lay it over the filling, pinching the sides at the edges. Brush the beaten egg over the top of the crust (will make it nice and golden brown). Cut 4 slits in the center in a design to let the steam escape. Sprinkle the whole crust with salt. Bake for 35-40 minutes, until crust is golden and flaky. Serve yourself and your friends big spoonfuls.

Recipe: Whole Wheat Banana Bread

Oh my god, my stomach hurts. No, it is not food poisoning. No, I do not have a stomach bug. Despite all my upcoming finals and pesky presentations, I make time for what matters most: experimenting with and obsessing over desserts. I just ate ¼ of a loaf of banana bread, several different types of baklava, many, MANY brownies, gelato, and a quarter pound cookie. Dessert night rules. Recently, I have been trying to find the perfect whole-wheat banana bread recipe. Baking with whole wheat is often a huge pain, because it does not act like white flour, and most types of whole wheat flours carry with them a weird bitter taste. However, I recently discovered white whole wheat flour at Trader Joe’s.

I initially believed it was some marketing BS, that “white whole wheat flour” was just white flour, but in fact, it is whole wheat, and it is good. Really good. Regular white and whole wheat flours are milled from red wheat. White whole wheat flour is milled from white wheat. It does not have the typical whole wheat taste, but it still has its properties. I do not know the specifics, but, basically, white flour has had the bran and germ from the wheat removed. This makes things made with white flour lighter and fluffier than things baked with whole wheat flour, but it also makes the flour itself much less nutritious! So, when I’m making something like banana bread and want to pretend that I’m being healthy (healthier at least), I use whole wheat flour.

I have tried several whole wheat banana bread recipes, but this one takes the cake. Or bread. Whatever. This whole wheat bread is the closest to white flour banana bread as I've ever had. Yum. Of course, it benefited from my chocolate layer technique, but so do all the banana breads I bake, regardless of recipe. I also ignored all the stuff about the millet, because I don't have time to go find some!

So without further ado, here is the recipe:

Crackly Banana Bread
(From Smitten Kitchen)

Ingredients
3 large ripe-to-over-ripe bananas
1 large egg
1/3 cup (80 ml) virgin coconut oil, warmed until it liquefies, or olive oil
1/3 cup (65 grams) light brown sugar
1/4 to 1/3 cup (60 to 80 ml) maple syrup (less for less sweetness, of course)
1 teaspoon (5 ml) vanilla extract
1 teaspoon (5 grams) baking soda
1/4 teaspoon table salt
1 teaspoon ground cinnamon
1/4 teaspoon freshly grated nutmeg
Pinch of ground cloves
Salt
1 1/2 cups (180 grams) white whole-wheat flour (or flour mixture of your choice, see Note up top)
1/4 cup (50 grams) uncooked millet

Steps
Preheat your oven to 350°F and butter a 9×5-inch loaf pan. In the bottom of a large bowl, mash bananas with a potato masher or the back of a wooden spoon until virtually smooth but a few tiny lumps remain. Whisk in egg, then oil, brown sugar, syrup and vanilla extract. Sprinkle baking soda, salt, cinnamon, nutmeg and cloves over mixture and stir until combined. Stir in flour until just combined, then millet.

Pour mixture into prepared pan and bake until a tester comes out clean, about 40 to 50 minutes. Cool loaf in pan on rack.

Here are my pictures of me putting pieces of the chocolate layers in and a picture of the finished product. I forgot to take a picture until like 30 minutes after it came out of the oven, and by then my housemates and I had almost finished it!

Tuesday, December 4, 2012

Comfort Food: Spaghetti and Garlic Bread

In conjunction with Penn Appétit's comfort-food themed Fall 2012 magazine, we are featuring a few of our bloggers' favorite comfort foods, along with their cherished recipes.

Today's featured recipe:
Spaghetti with sausages and meatballs and a side of garlic bread

On a cold winter’s day, there may be nothing more comforting than indulging in a bowl (or plate, depending on your style) of hot spaghetti with sausages and meatballs. As a young girl, I remember the delight of watching my mom prepare the meal. She would effortlessly sprinkle spices into the pot, creating a rich sauce perfectly accented by the Italian seasonings and red wine. But, spaghetti nights were not completely filled with sheer enjoyment. For, I remember how disgusted I was with the prospect of touching raw meat to form the meatballs! Whenever I helped make this dish, my mom would always tease me while she prepared the meatballs, holding out her meat-encrusted hands with amusement. I, however, would focus on the chopping of ingredients or on the sautéing of the sausages or meatballs, desperately trying to avoid glancing at the meatball preparation. Yet now that I’m away from home, I’ve had quite a craving for my mom’s spaghetti and meatballs. If I can only get over my fear of forming the meatballs, I’ll be good to go! Below is my mom’s recipe for spaghetti with sausages and meatballs. The spaghetti normally lasts my family of four two days. I always think that the second day is the best, since the flavors of the sauce have been able to marinate together. So, even if you only have a little bit left after the first night, keep it! My mom also really likes spicy food, so this recipe can tend to be a little on the hot side. If you prefer less spicy spaghetti, use sweet sausage rather than hot Italian sausage (Andouille is particularly delicious!). You can also omit the red pepper. But, I highly recommend trying the spaghetti as is—sometimes, a bit of spice is rather nice! Also—we always have our spaghetti with garlic bread! I’ve included the recipe below as well.

-Katie Behrman

The Recipe

Ingredients (meatballs)

One package ground sirloin (between 1 and 1.5 lbs)
1 egg
2 garlic cloves, chopped, one to put in meatball mixture and one to sauté
½ c seasoned breadcrumbs
¼ c milk
1 carrot, chopped (optional)
½ med onion, chopped
½ tsp coarsely ground black pepper for meatball mixture + ¼ tsp coarsely ground black pepper to sauté
1/8 tsp kosher or sea salt ¼ tsp basil (dried)
¼ tsp oregano
1/8 tsp crushed red pepper
2 Tbsp extra-virgin olive oil to sauté

Directions (meatballs)

Mix ingredients together in a large bowl and form mixture into balls with bare hands(around 12-15).
Sauté 1 clove chopped garlic, 2 tbsp olive oil, and ¼ tsp black pepper in frying pan until fragrant. ADD meatballs and cook over med-low heat around twenty minutes (don’t handle the meatballs too much as they can easily break. I find it helpful to rotate the meatballs about every 5 minutes—when the side has been browned). The meatballs do not need to be fully cooked, as they’ll cook in the sauce.

Ingredients (spaghetti sauce)

Meatballs (see above)
One package Hot Italian Sausage (or sweet if you prefer)
2 29 oz cans tomato sauce (Hunt’s is good)
2 14.5 oz cans stewed tomatoes, Italian style
1 small can tomato paste
around 6 leaves fresh basil, torn
1 tsp red pepper, crushed
1 tsp fresh oregano, chopped
½-1 onion, chopped
one red and one green pepper, chopped (optional)
1 clove garlic, chopped
½ c – 1 c red wine (cabernet sauvignon) (optional)
1 bay leaf
2 Tbsp extra-virgin olive oil
sea or kosher salt and coarsely ground black pepper to taste

Directions (spaghetti sauce)

Cook sausage in frying pan while cooking meatballs in another frying pan, around twenty minutes. After sausage is cooked, transfer to a plate with paper towels and dab away the grease. Then, slice sausage fairly thick.
Begin sauce. In a dutch-oven, sauté garlic, pepper (1/4 tsp) and onions in 2 Tbsp olive oil on medium heat until onions are translucent, around three minutes. Add peppers and cook an additional three – five minutes, if desired.
Add tomato sauce and stewed tomatoes, oregano, basil, bay leaf, red pepper, tomato paste and red wine to the dutch-oven. Season to taste with salt and pepper. ADD sausage and meatballs to the sauce.
Simmer covered on med-low heat around thirty minutes (the longer you simmer, the longer the flavors will have to blend together!).
Serve over thin spaghetti or vermicelli (cooked according to package directions).

Ingredients (garlic bread)

1 baguette
½-1 stick butter (softened)
1-2 cloves chopped garlic
Drizzle of olive oil
Fresh basil (optional, though encouraged)
Parmesan cheese (optional, though encouraged)

Directions (garlic bread)

Cut bread horizontally (so that there’s a top and a bottom).
Add garlic to softened butter and mix with fork.
Spread butter mixture onto bread.
Drizzle with olive oil.
Sprinkle with parmesan cheese.
Sprinkle with fresh basil.
Bake at 350F or broil wrapped in tinfoil until golden brown.
*Note: You can never have too much butter, air on the side of decadence!

Comfort Food: Macaroni and Cheese

In conjunction with Penn Appétit's comfort-food themed Fall 2012 magazine, we are featuring a few of our bloggers' favorite comfort foods, along with their cherished recipes.

Today's featured recipe:
Macaroni and Cheese

Something magical happens when you combine pasta with cheese. Pasta itself is yummy and cheese is one of my top food groups, but a marriage of the two creates my favorite comfort food- mac and cheese.

Like any other die-hard macaroni and cheese fan, I don’t discriminate between the fancy and cheap stuff. I was the girl who got far too excited about mac-and-cheese day in the elementary school cafeteria. I spent a sizeable part of my childhood winters contentedly eating Annie’s Shells and Cheddar by the bowlful, and still perk up at the sight of its iconic purple box. In my opinion, mac and cheese is just as good in a paper bowl as a glass dish- both White Dog’s savory lobster mac and cheese and Boston Market’s gooey cheesy mac rank close to heavenly on my list. And I will admit, at late hours of the night, even Wawa mac and cheese has something to offer.

Until recently, mac and cheese was something that was prepared for me, and I had never attempted it myself. However, with a kitchen of my own this year, I decided with my friend, a fellow mac-and-cheese aficionado, to try making some of our own. We found a Martha Stewart recipe on the popular food blog SmittenKitchen, and the results were incredible.

We knew we had found something special, even before the mac and cheese was done, upon sampling the cheese sauce. My friend and I would have been completely content simply eating the cheese sauce from the pot- the combination of milk, butter, Wisconsin white cheddar cheese, and pepper was unlike anything I’d ever tasted.

When I took my first bite of the final product, I knew I had found my new favorite. It was honestly one of the best mac and cheeses I’ve ever had. How such simple ingredients could yield something so delicious never fails to amaze me- every single person who I (begrudgingly) offered it to instantly was hooked. The white cheddar was smooth and creamy, and the kick of pepper kept the cheese from dulling my taste buds. The entire combination was pure comfort.

I’m tempted to say this is one of the finest mac and cheeses I’ve had the pleasure of enjoying. I'm also not a super experienced cook, and this was so easy to prepare. I have a feeling when I’m home for winter break, this is going to replace Annie’s Shells and Cheddar as a staple. This savory, gooey, cheesy dish is simply too good to pass up.

Martha Stewart’s Creamy Mac-and-Cheese
Adapted from Martha Stewart Living Cookbook: The Original Classics

Serves 12
Note: When my friend and I made the mac-and-cheese we adjusted it to four servings. We used pre-made breadcrumbs, omitted the nutmeg, and used packaged crumbled parmasean cheese. The first two changes were completely acceptable, but in the future, I'd definitely recommend using fresh grated parmesan instead for improved melting and a smoother texture.

Ingredients:
8 tablespoons (1 stick) unsalted butter, plus more for casserole
6 slices white bread, crusts removed, torn into 1/4- to l/2-inch pieces
5 1/2 cups milk
1/2 cup all-purpose flour
2 teaspoons coarse salt, plus more for water
1/4 teaspoon ground nutmeg
1/4 teaspoon freshly ground black pepper
1/4 teaspoon cayenne pepper
4 1/2 cups (about 18 ounces) grated sharp white cheddar cheese
2 cups (about 8 ounces) grated Gruyère or 1 1/4 cups (about 5 ounces) grated Pecorino Romano cheese
1 pound elbow macaroni

Directions:
1. Preheat oven to 375°F. Butter a 3-quart casserole dish; set aside. Place the bread in a medium bowl. In a small saucepan over medium heat, melt 2 tablespoons butter. Pour the melted butter into the bowl with the bread, and toss. Set the breadcrumbs aside.
2. Warm the milk in a medium saucepan over medium heat. Melt the remaining 6 tablespoons butter in a high-sided skillet over medium heat. When the butter bubbles, add the flour. Cook, stirring, 1 minute.
3. While whisking, slowly pour in the hot milk a little at a time to keep mixture smooth. Continue cooking, whisking constantly, until the mixture bubbles and becomes thick, 8 to 12 minutes.
4. Remove the pan from the heat. Stir in salt, nutmeg, black pepper, cayenne pepper, 3 cups cheddar cheese, and 1 1/2 cups Gruyère (or 1 cup Pecorino Romano); set the cheese sauce aside.
5. Cover a large pot of salted water, and bring to a boil. Cook the macaroni until the outside of pasta is cooked and the inside is underdone, 2 to 3 minutes. Transfer the macaroni to a colander, rinse under cold running water, and drain well. Stir the macaroni into the reserved cheese sauce.
6. Pour the mixture into the prepared dish. Sprinkle the remaining 1 1/2 cups cheddar cheese, 1/2 cup Gruyère (or 1/4 cup Pecorino Romano), and the breadcrumbs over the top. Bake until golden brown, about 30 minutes (though we needed a bit more time to get it brown, but your oven may vary). Transfer the dish to a wire rack for 5 minutes; serve.

Monday, December 3, 2012

Comfort Food: Clam Chowder

In conjunction with Penn Appétit's comfort-food themed Fall 2012 magazine, we are featuring a few of our blogger's favorite comfort foods, along with their cherished recipes.

Today's featured recipe is:
Port Townsend Clam Chowder

Everyone knows that clam chowder is considered a quintessential New England food. However, like most Northwesterners, clam chowder played a large part in my childhood too. The begginings of clam chowder in the Pacific Northwest can be traced to the sucessful Seattle seafood-joint Ivar's Chowder House, opened in 1946 by folk singer Ivar Haglund. The restraunt was so sucessful, in fact, that Haglund's song "Acres of Clams" is now Washington's unofficial state song. Now Ivar's clam chowder is sold everywhere- you can buy a bowl while watching a Mariner baseball game or while riding a ferry boat across the Puget Sound.

As delicious as Ivar's clam chowder is, I'm partial to my grandma's recipe that has been passed down to me. In the 1960s my grandma would make her chowder from clams that my grandpa, mom and aunts had freshly dug from Marrowstone Island, across the water from their home of Port Townsend, WA. Nowadays, however, my family prepares it with canned clams that you can find at any grocery store.

-Elliott Brooks

The Recipe

Ingredients

3 Tbsp butter
2 yellow onions
1/2 lb. bacon pieces,chopped
1 large potato, cubed
1 cup chopped clams
1 pint (2 C) heavy cream or half-and-half or milk
Clam nectar (steaming juice) or commercially bottled clam juice or potato cooking water or milk as needed
Salt and pepper to taste

Directions


Brown bacon pieces and reserve.
Drain all but 1 T bacon fat from skillet add butter and saute onions slowly till golden and well cooked.
In saucepan place potatoes and cover with cold water.
Bring to boil and slow boil 20 minutes or until soft.
Add potato to onions, add bacon, clams and cream.
Dilute to taste with clam nectar.
Heat but do NOT boil.
Season to taste.

Thursday, November 29, 2012

Waffle Grilled Cheese- a scrumptious pinch

One rather chilly evening last week, I decided that it was utterly impossible to traverse across campus in search of food. Frogro, certainly, was out of the question. That left me with two options: order from Grubhub or eat whatever I had in stock. Unfortunately, any delivery would probably take an hour, and I was far too hungry to wait. So, I ventured to my kitchen in search of something edible. However instead of finding any ingredients that went well together, I was met with a rather eclectic selection: oatmeal, white cheddar cheese, prosciutto, yogurt, expired milk, and pancake mix. Although I had eaten oatmeal for dinner in the past, I really wanted something a little more substantial. And, sadly, none of my other ingredients seemed dinner appropriate.

I dismally reflected on my options, for none of them seemed too appealing. Yet, suddenly, I remembered reading an article a year or two ago about a girl whose mom would often make waffles with cheese for dinner. Since I had pancake mix and a waffle iron, I could try to do the same--and I could add the prosciutto as well! While preparing the waffle batter, I had trouble deciding how I should put the cheese into the waffles. Should I place it into the batter, as I would with blueberries or strawberries? Or, should I first make the waffle and then place the cheese and prosciutto in the middle of the two slices?

I decided on the latter. I poured the waffle mix into the iron and let it cook until the steam disappeared. The waffles looked delicious—light, fluffy, and golden brown. I then transferred one of the waffle quarters into a frying pan and delicately positioned the slices of cheese and prosciutto on top. I took the second waffle quarter and placed it over the cheese and prosciutto. Then, as I would with a grilled cheese, I cooked the waffle sandwich over medium heat, flipping it over to prevent burning. Once the cheese had melted, I transferred the waffle sandwich to a plate and dug in. It was scrumptious. The light and fluffy waffle tasted almost like a biscuit. The cheese sopped into each and every hole, accenting the soft texture of the waffle and the crispy prosciutto. The prosciutto did taste a bit salty, however, so I’m tempted just to use regular ham next time. However, the next time I’m in a pinch for dinner, I know that I’ll first look to see if I have pancake mix and cheese. In fact, I may try to be in a pinch a little more—maybe, once a week. Or, even, once a day!

Photo courtesy of the TasteSpotting blog.

Wednesday, November 28, 2012

Our Favorite Blondies

Dear Kevin,

I think we should be friends. It’s quite obvious that we both have excellent taste in food, and when it comes right down to it, what better way is there is make a friend than to share a meal? In our case, however, I would recommend sharing dessert. After all, we both have an appreciation for anything chocolate. We both like our desserts warm from the oven – a soft crumb, a moist inside, and a melting scoop of ice cream spreading across the plate. Most importantly, however, we both have the same favorite blondie. It’s true that they were your favorite long before they were mine, but you’ll have to excuse me for spending a few years in the dark. When I saw the post on your wife, Kristen’s blog, and when I saw the photos of the perfect squares flecked with peanuts and oozing chocolate, I didn’t wait long before making them. I assembled the peanut butter and peanuts, the flaked coconut and semisweet chocolate, and I haven’t turned back since. I tasted a tiny square right out of the oven. Yum! I came back for seconds a bit later, and I came back for thirds and fourths and maybe even fifths. (We can keep the exact number to ourselves.) Somewhere in the middle of tasting and savoring and licking the last drop of chocolate off my fork (Yes, I eat blondies with a fork. I hope that’s okay), I realized they were my favorite blondies: that and my favorite bar cookie and maybe even my favorite dessert.

I’m writing this note to say thank you – thank you for having such good taste and thank you for inspiring the post that gave me my favorite blondie. I don’t think I can repay the favor, but if you’d like to be friends, I’ll gladly bake a batch of these blondies. Maybe, if I’m feeling generous, I’ll even let you have more than one.

Happy eating,

Laura


The recipe for Kevin and my favorite blondies is from The Kitchen Sink Recipes blog and can be found here. It is also below with a few of my notes added in.

Peanut Butter-Chocolate Chunk Blondies

1 1/2 cups all-purpose flour (using half whole wheat pastry flour and half all-purpose flour also works)

1 teaspoons baking powder

1/2 teaspoon cinnamon

1/4 teaspoon salt

1/2 cup (1 stick) unsalted butter, softened

1/2 cup all-natural peanut butter

1 1/4 cups firmly packed light brown sugar

2 large eggs

1 teaspoons vanilla

1 cup bittersweet or semi-sweet chocolate, coarsely chopped

1/2 cup unsalted peanuts, finely chopped (using other nuts works as well)

1/2 cup flaked coconut

Preheat the oven to 350. Butter and flour a 9-inch square pan. If you don’t have a 9-in square pan, you can use something that’s approximately the same size. Just be warned that the cooking time will vary accordingly. The blondies are best thick, so I would recommend an 8-in square pan above a 9x13in if you are going to substitute.

In a medium bowl, whisk or sift together the flour, baking powder, cinnamon and salt. Set aside.

In the bowl of a stand mixer, mix the butter and peanut butter until fluffy. Make sure that you allow the butter to sit at room temperature for at least 45 minutes ahead of time so that it softens. Add the sugar and mix until combined. Add the eggs and vanilla and mix until combined. With the mixer running on low speed, slowly add the dry ingredients, mixing until just combined.

Using a spatula or wooden spoon, fold in the chocolate, peanuts and coconut. Be sure to chop the peanuts very finely. The texture is much better that way. Bake the blondies in the center of the pre-heated oven for 30 minutes, or until the blondies have just begun to brown around the edges.

Allow the blondies to cool completely in the pan before cutting. If like me, you’re too impatient to wait, you can cut a piece earlier. Just expect the edges to be rather messy.

Tuesday, November 27, 2012

Banana Chocolate Chip Muffins with Hazelnuts

When it comes to grocery shopping, I would generally consider myself a practical person- I almost always buy the generic brand over name brand, I meticulously write out shopping lists to avoid forgetting an item, I even scan over ingredient labels to check for quality. On the other hand, when it comes to baking, I tend to do things that make people question my sanity.
Today presented a perfect example. While munching on breakfast, my eyes were drawn to the bunch of speckled overripe bananas innocently perched on the dining table. Almost instantly, I was overcome with a baking itch. This is not the kind of itch that you can just scratch and it’ll go away. No, this is like the nastiest mosquito bite you ever had; it only gets worse and worse until you scratch yourself silly. Just the site of overripe bananas screamed banana bread in my mind. I knew that I would not be satisfied until I had transformed those shriveled black bananas into a scrumptious baked treat.
I am the type that will go out and buy flour, eggs, nuts, etc. just to save two black bananas rather than just trashing them or freezing them for smoothies like any rational person. Luckily, today I happened to have just enough ingredients on hand for muffins but this is usually not the case. I usually have to go to great lengths to save a few speckled bananas. Many people do not understand the magic of overripe bananas; no sarcasm intended. The blacker the better! Although they may be past their prime for straight up snacking, there is nothing more perfect for baking. They contribute a fragrant banana-y flavor as well as moisture and natural sweetness to baked goods.
For today’s recipe, I created a twist on classic banana bread and baked the batter into portable muffin form. Banana puree and sour cream add moisture while the vanilla and hint of espresso add depth of flavor. Semi-sweet chips create bursts of rich, chocolaty goodness and perfectly complement the crunchy hazelnut topping. The addition of whole wheat flour adds fiber and antioxidants so you can almost feel virtuous eating them.(I said almost. Just overlook the sour cream and sugar.) These muffins are moist, light, and definitely indulgent. Health conscious or not, they are sure to please.

Banana Chocolate Chip Muffins with Hazelnuts

Ingredients:

*1 c. whole wheat pastry flour (can be found in most health food stores)
¾ c. all-purpose flour
½ tsp. baking soda
2 tsp. baking powder
Pinch of salt
1 c. banana puree (about 2 medium bananas)
1/3 c. white sugar
1/3 c. brown sugar
1 c. sour cream, room temperature
1 egg, lightly beaten, room temperature
1 tsp. instant espresso
1 ½ tsp. pure vanilla extract
¾ c. semi-sweet chocolate chips
½ c. chopped hazelnuts

Directions:
Preheat oven to 375°. Line a 12 cup muffin pan with paper liners and spray with cooking spray.
Whisk together flours, baking soda, baking powder, and salt in a large bowl. Dissolve instant espresso in vanilla, whisk in banana puree, sugar, sour cream and the egg until smooth.
Gently stir together wet and dry ingredients until just combined.
Fold in chocolate chips. Divide batter evenly among prepared muffin cups. Top with hazelnuts and gently press into batter
Bake 16-20 minutes or until lightly browned and toothpick comes out clean. Cool 5 minutes in pan before removing to wire rack to cool completely. Nomnom!

Makes 12 muffins

*Can substitute all white flour or use regular whole wheat flour; if using regular whole wheat flour, only use 1/2 c. whole wheat flour and increase all purpose flour to 1 1/4 c.


Wednesday, November 21, 2012

Uses for Leftover Chocolate (Or: How to make your chocolate chips awesome!)

Last week, when I was writing about my favorite cookies, I shared my disdain for chocolate chips. To reiterate: chocolate chips are too small and result in chocolate being spread too far throughout baked goods. I mentioned that I had a way of transforming these unsubstantial bits of chocolate into something useful. Today I will share that technique.

I call them chocolate layers. They are best used in large baked goods like banana bread or pound cakes, and can turn any dry and unremarkable baked good into a chocolate lover’s delight. One can make them using any chocolate they have, be it in chocolate bar form or chocolate chip form. This does not occur because more chocolate is used; it occurs because with these layers, pockets of chocolate are created which pack a lot more of an impact than teensy chocolate chips. To use them, you break them into strands of chocolate and insert them vertically into your dough or batter, adding batter then chocolate and repeating until there is no batter or chocolate left.

But you didn’t come here to read my justification for making giant chocolate layers. You came here for the chocolate. Let’s do this:

Chocolate Layers

Required Equipment:
-Baking Sheet
-Parchment Paper
-Large glass bowl + A pot to boil water in

Ingredients:
-At least 5 ounces of chocolate (darker chocolate works better in baked goods)
-Water to be boiled
-Sugar to taste (Optional, only use if using unsweetened chocolate)

Directions:
1. Cover a baking sheet with parchment paper. Fill pot halfway with water. Make sure glass bowl can sit atop pot on its own. Put the pot on the stove and turn the stove to high. Let the water get hot enough to begin steaming (almost a boil) and then turn down the heat just enough to maintain that steam.

2. Add chocolate to glass bowl. If using chocolate bars, chop chocolate into equal sized pieces before adding it. Put glass bowl on top of pot. Note: It is very important that no water touches any of the chocolate. If this happens, it will not melt and the chocolate will be useless.


3. Stir chocolate with a spatula. Do not stop stirring until the chocolate is smooth and completely melted.


4. Pour chocolate from bowl onto parchment paper. Smooth chocolate with spatula to desired thickness.


5. Put baking sheet with chocolate on it into the fridge. After 20 minutes check the chocolate. If it has solidified, it is ready to be used, if not, put it back in the fridge and wait another 10 minutes. Do not leave it in there for too long, it is not good for the chocolate.
6. Chocolate can be used immediately or can be stored for later use. To store it, just put it in a ziplock bag and store it at room temperature. It should not be stored in the refrigerator.

Wednesday, November 14, 2012

The Best Cookie Ever?

Big chocolate-chip cookies, small chocolate-chip cookies, giant chocolate-chip cookies stuffed with brownie. I certainly have a type. But, after a trip to Jacques Torres Chocolate in New York over Fall break, I am done with chocolate chips. Have I fallen out of love with chocolate? Of course not. Do I now think that chocolate and baked goods do not belong together? Preposterous. What then?

I have discovered something better. Some call them chocolate féves. Some call them chocolate discs. I call them “perfection.” I cannot fathom going back to regular chocolate chips. Nothing will ever be the same for me again. Chocolate feves even inspired me to melt down and shape my own chocolate for use in baking things like banana bread. However, I will delve into that subject another week. For now, let me share with you the recipe for a cookie I bought at Jacques Torres Chocolate that uses chocolate discs to amazing effect.

If you love chocolate this will absolutely be the best version of the classic chocolate-chip cookie that you ever make. It is perfectly crispy on the outside, chocolatey-chewy on the inside and has a slight hint of toffee. It truly is incredible. I do not usually write about recipes like this (these cookies are not especially crazy decadent except for their size), but I had four midterms this week and this cookie dough was already in my freezer, all ready to go. So without further ado, here is the recipe with a few of my notes in italics: (Note: All pictures here are from the internet; my camera is having problems).

Chocolate Chip Cookies
(From the New York Times)
Adapted from Jacques Torres

Time: 45 minutes (for 1 6-cookie batch), plus at least 24 hours’ chilling

Ingredients:
2 cups minus 2 tablespoons
(8 1/2 ounces) cake flour
1 2/3 cups (8 1/2 ounces) bread flour
1 1/4 teaspoons baking soda
1 1/2 teaspoons baking powder
1 1/2 teaspoons coarse salt
2 1/2 sticks (1 1/4 cups) unsalted butter
1 1/4 cups (10 ounces) light brown sugar
1 cup plus 2 tablespoons (8 ounces) granulated sugar
2 large eggs
2 teaspoons natural vanilla extract
1 1/4 pounds bittersweet chocolate disks or fèves, at least 60 percent cacao content (see note, linked is the bag that I have)
Sea salt

Directions:
1. Sift flours, baking soda, baking powder and salt into a bowl. Set aside.

2. Using a mixer fitted with paddle attachment, cream butter and sugars together until very light, about 5 minutes. Add eggs, one at a time, mixing well after each addition. Stir in the vanilla. Reduce speed to low, add dry ingredients and mix until just combined, 5 to 10 seconds. Drop chocolate pieces in and incorporate them without breaking them. Press plastic wrap against dough and refrigerate for 24 to 36 hours. 36 hour fridge cookies are noticeably better than 24 hour fridge cookies (and, of course, much, much better than cookies where the dough has not been refrigerated).
Dough may be used in batches, and can be refrigerated for up to 72 hours.

3. When ready to bake, preheat oven to 350 degrees. Line a baking sheet with parchment paper or a nonstick baking mat. Set aside.

4. Scoop 6 3 1/2-ounce mounds of dough (the size of generous golf balls) onto baking sheet, making sure to turn horizontally any chocolate pieces that are poking up; it will make for a more attractive cookie. The cookies spread out quite a bit, be extremely careful when spacing them or the sought-after crispy outside/gooey inside will be ruined! When in doubt, just put in fewer cookies at a time, baking time remains the same regardless of how many cookies are on a baking sheet.
Cookies can be taken out when their edges are golden yet their centers are still pale. If you are unsure, remember that it is better to underbake than to overbake (it just makes the cookies all gooey and no crunch!).
Sprinkle lightly with sea salt and bake until golden brown but still soft, 18 to 20 minutes. Do not skip this step. Transfer sheet to a wire rack for 10 minutes, then slip cookies onto another rack to cool a bit more. Repeat with remaining dough, or reserve dough, refrigerated, for baking remaining batches the next day. Eat warm, with a big napkin.

Yield: 1 1/2 dozen 5-inch cookies.

Note: Disks are sold at Jacques Torres Chocolate; Valrhona fèves, oval-shaped chocolate pieces, are at Whole Foods.

One more note:

-1.2 oz cookies can be made as well. I only made one of these when there wasn't enough cookie dough for the larger cookies, but I really prefer them. In my opinion, the best part of these cookies is how they manage to be chewy and crispy at the same time, and the issue with the large cookies is that people often split them or just have a little bit. Only by eating the whole cookie can one fully appreciate the crispy/chewy texture. These smaller cookies allow people to do just that without the guilt that eating nearly quarter pound cookies brings (I must admit, I ate about 5 of the giant cookies over the course of the two days that I baked them a few weeks ago. Oh yes. When I am unhealthy, I go as far as possible.) These smaller cookies should be baked 12-14 minutes (a little longer than 13 was perfect for me). With these smaller cookies, the time cookies should sit outside of the oven before they are placed on the wire rack can be reduced to more like ~5 minutes.

Thursday, November 1, 2012

Taste the Celebration


When I was in first grade, I became obsessed with fairies. I had a fairy house – think dollhouse – outside, and I spent hours making furniture out of twigs and delectable fairy delicacies out of flowers. So of course, when the leaves began to turn and my birthday planning began, I asked for a fairy themed party. My mom and I planned fairy games, crafts, and costumes, and after I submitted my request for lemon cake and vanilla icing, my mom planned the cake. On the day of my party, as all my classmates sang “Happy Birthday,” my mom carried a beautiful fairy to the table – my favorite lemon cake forming the giant domed skirt of a repurposed Barbie doll with a blue icing bodice and wings.

When I was little, I always wanted plain lemon cake, but the shapes my mom created each year stole the show. Koala bear faces and teacups for me, footballs and train tracks for my brother: food coloring, carving, and lots of love. Ever since I can remember, birthday cakes have been a big deal in my house. At some point along the line, the cakes became simple round layers, and I shifted my allegiance from lemon cake to chocolate with a year or two of carrot cake limbo in between. Nevertheless, I still see birthday cakes as the center of the celebration – a birthday necessity made to order.

This year, I was lucky enough to be home for my mom’s birthday which meant that I had the all-important honor of baking her cake. Not surprisingly, she asked for chocolate cake and in particular for what has become our favorite chocolate cake from Bon Appétit. Considering the multitude of chocolate cakes we’ve tried over the years, that’s quite a compliment. With a moist and fluffy crumb, the cake melts deliciously in your mouth.

Cake decided, it was time to choose the icing to top it off. To the great satisfaction of my taste buds, my mom selected chocolate ganache. With its fancy French name, I used to think ganache was a difficult and sophisticated preparation reserved for restaurant desserts. Luckily, I discovered before too long that it is remarkably easy – requiring just a quick whisk of warm cream and chopped chocolate. Even more importantly, it is lick-the-bowl, never-eat-store-bought-icing-again kind of good.

When I carried the cake to the table on my mom’s birthday, it wasn’t quite as showy as the fairy of years ago. It didn’t feature food coloring or carving. It wasn’t colorful or creative. But it was just as delicious as any birthday cake before and it was baked with just as much love.

My favorite chocolate cake recipe can be found here on the Bon Appétit website. Oddly enough, I’ve never made the cream filling or ganache recipes that are paired with the cake, but I think you’ll love the cake regardless of the fillings and icings you choose.

Monday, October 29, 2012

Recipe: Cauliflower Crust Pizza

This past summer, I decided I was going to cut down on my intake of flour. As a person whose breakfasts consisted of bagels and whose lunch always included a sandwich, I thought I would have a tough time removing unnecessary bread from my diet. Slowly but surely, however, eggs replaced bagels, and greek yogurt or chicken leftovers replaced sandwiches, and I hadn’t looked back until a week ago. After my friend talked to me about the amazing pizza in New Haven (it really is incredible), I was reminded of how much I love pizza. For me, the single greatest ingredient in the world is an aged cheese, and pizza is the world’s greatest vehicle for any cheese. With my desire for pizza reignited, I set about looking for a delicious alternative to the classic flour-filled pizza dough crust. What I found amazed me.

From eggplant crust to spinach crust pizza to “meatza” (a crust made entirely out of meat), the internet threw tons of suggestions my way. I finally settled on using cauliflower as it is excellent at absorbing flavor but would not add enough of its own to remind me I was not eating real pizza. After testing out several different recipes, I found one that yielded a perfectly crispy and stable crust. I tweaked it and added some helpful notes. I was surprised at how good this healthy pizza turned out and I think you will be too.

Cauliflower Crust Pizza
Slightly tweaked from Kalyn’s Kitchen

Makes a little more than two servings.

Crust Ingredients:
1 cup finely chopped cauliflower (chop in food processor)
1/2 cup finely grated low-fat mozzarella cheese
~6 T almond meal/almond flour (Much cheaper if you make it yourself; just throw almonds into a food processor until they become a fine powder. Make sure to not overdo it as this will result in almond butter)
3 T finely grated Parmesan cheese
1 tsp. dried oregano
1/2 tsp. garlic powder
pinch of salt
1 large egg, beaten

Pizza Toppings:
Whatever you like!
I like to top it with pesto (click for link to good basic pesto recipe), whatever cheese I am into at the moment, prosciutto, sun-dried tomatoes, and mushrooms.

Instructions:
Turn on the oven or grill, place the pizza stone inside (if using), and preheat grill or oven to 450F/230C. (If you don't have a pizza stone I might let the temperature get slightly higher.)

Use a food processor to finely chop the cauliflower until it resembles small kernels of rice. Put the cauliflower into a bowl and microwave until it's cooked through and soft, about 5-8 minutes. (Don't add water; the cauliflower will release moisture.)

If you don't have finely grated Mozzarella, pulse it a few times in the food processor so it's more finely grated.

In a small bowl, combine the cooked cauliflower, 1/2 cup finely grated low-fat mozzarella, almond meal, Parmesan cheese, dried oregano, garlic powder, and salt. Beat the egg with a fork and then mix it into the other ingredients, combining them well. The dough should be sticking together pretty well at this point. If the dough is still very wet at this point, add another tablespoon or two of almond meal to soak up excess moisture.

Spray a heavy cookie sheet with non-stick spray (or cover with non-stick foil for easy cleanup). Form the crust ingredients into a ball and place on the cookie sheet, then use your fingers to form the crust, spreading it out as thin as you can get it. Put the cookie sheet on the pizza stone in the oven and cook with the door or lid shut until the crust is firm and lightly browned, about 13-15 minutes.

When the crust is done, spread with pizza sauce, sprinkle with cheese, and arrange toppings on top. Put pizza back in the oven and broil for about 3-5 minutes it to melt the cheese and heat the toppings. Be careful as the toppings will burn if you broil the pizza too long.

Enjoy while still warm! Note: All pizzas other than the one pictured were circular, but I was not patient enough to take pictures before I devoured them.

Friday, October 26, 2012

Recipe: Pumpkin Bread

It seems that with the onset of fall, everyone is pumpkin-obsessed. From everyone's undying love for Starbucks' Pumpkin Spice Latte, to the miraculously edible pumpkin soup in Commons, fall is the season of pumpkin. Which is fine by me. Pumpkin has such a smooth texture that it can go into virtually anything. Since pumpkin is technically a vegetable, I can devour sugared up pumpkin treats all in the name of getting in my daily serving of vegetables.

Which brings me to the awesomeness of pumpkin bread. It's a vegetable and bread so it's a perfect fall themed snack. I adapted this recipe from all recipe's Downeast Maine Pumpkin Bread. Although there's a long shopping list of spices, I you can just use a ton of pumpkin pie spice, which is usually a blend of cinnamon, nutmeg, and ginger. Enjoy, and don't skimp on the chocolate chips!


Pumpkin Bread

Ingredients:
1 can pumpkin puree (15 ounces)
4 eggs
1 cup vegetable oil
2/3 cup water
1 teaspoon vanilla extract
3 cups sugar
3 1/2 cups all-purpose flour
2 teaspoons baking soda
1 1/2 teaspoons salt
1 teaspoon ground cinnamon
1 teaspoon ground nutmeg
1/2 teaspoon cloves
1 teaspoon allspice
1/4 teaspoon ground ginger
2+ cups chocolate chips

Directions:
1. Preheat oven to 350 degrees F (175 degrees C). Grease and flour three 7x3 inch loaf pans
2. In a large bowl, mix together pumpkin puree, eggs, oil, vanilla, water and sugar until well blended.
3. In a separate bowl, whisk together the flour, baking soda, salt, cinnamon, nutmeg, allspice cloves and ginger
4. Stir the dry ingredients into the pumpkin mixture until just blended and add the chocolate chips. Pour into the prepared pans.
5. Bake for about 50 minutes in the preheated oven. Loaves are done when toothpick inserted in center comes out clean. Be sure not to over bake or it'll become spongy!

Monday, October 22, 2012

Contest Recipe: Mini Pumpkin Pie Tartlettes (And Strawberry Tartlettes)

Saturday was Stouffer's Fall Festival and baking contest. Despite having never entered a baking contest before, I won! There was intensely fierce competition (okay, actually only two entries total in the whole contest) but my opponent's marbled brownies looked super delicious. In the end, I walked away with my prize: an old Stouffer Move-in Day t-shirt.

Because the Stouffer contest was a fall festival baking contest, I thought it was natural that the treat should be fall themed. Pumpkin pie immediately came to mind. Pumpkin pie is traditionally spiced with cinnamon, ginger, nutmeg and cloves, sweetened with brown sugar and enriched with evaporated milk. A classic pastry crust usually envelops the creamy pumpkin custard filling. I wanted to create a twist on the original using honey and almonds as the theme. To make the treats more portable, I decided to make individual pumpkin tarts in muffin tins. Crushed up honey grahams and ground almonds were the base for my crumb crust. For the filling, I decided to use honey instead of brown sugar and heavy cream instead of evaporated milk for extra richness. Finally, to top it all off, I baked candied cinnamon spiced almonds to add a contrast to the creamy filling and provide crunch.

Without further adieu, here is the recipe:

Mini Pumpkin Pie Tartlettes and Honey Almond Fruit Tarts

Ingredients
1 package Honey Graham crackers (about 1 1/2 cups crumbs)
½ c. ground almonds or almond meal
6 tbsp. melted butter
2 tbsp. granulated sugar
2 tbsp. brown sugar
1 (15 oz.) can pumpkin puree (NOT pumpkin pie filling)
3 large eggs
¾ c. heavy cream
½ c. honey
1 tsp. vanilla extract
2 tsp. pumpkin pie spice or substitute:
1 tsp. cinnamon
½ tsp. ground ginger
¼ tsp. nutmeg
¼ tsp. cloves
½ tsp. salt

Fresh whipped cream
1 c. heavy cream
4 tbsp powdered sugar

Candied Almonds
2 tbsp melted butter
4 tbsp brown sugar
2 tbsp honey
½ tsp cinnamon
Pinch of salt
2 tbsp flour
7 oz. sliced almonds

Whipped cream cheese filling
2 oz. cream cheese, room temperature
¼ tsp. almond extract pinch of cinnamon
2 tbsp honey ½ c. whipped cream

Fresh Fruit (blueberries, strawberries, diced peaches, whatever you like)

Preparation
Preheat oven to 375 degrees.
Line 21 muffin cups with paper or foil liner.
Crush graham crackers into fine crumbs. Mix crumbs together in a bowl with almond meal, butter, and sugar. Press mixture evenly into prepared muffin tins.
Bake 5 minutes and let cool completely. Set aside 6 tart shells. Decrease oven temperature to 350 degrees.
Blend together pumpkin, eggs, honey, vanilla, spice, and salt. Pour and divide evenly among 15 tart shells. Bake 18-22 minutes, or until filling is set. Let cool completely on a wire rack and chill in the refrigerator.

To make whipped cream:
Chill bowl and beaters for at least ten minutes in the refrigerator and make sure the heavy cream is thoroughly chilled as well before beginning. Beat heavy cream at med low speed with a hand held mixer for about one minute. Increase speed to high and beat until soft peaks form. Gradually beat in powdered sugar.

To make Candied Almonds:
Preheat oven to 375 degrees.
Mix together butter, sugar, honey, cinnamon, salt, and flour. Add sliced almonds and toss until evenly coated. Line a large cookie sheet with aluminum foil and spray nonstick with cooking spray. Spread almonds in a single layer on prepared sheet. Bake 10-12 minutes or until golden brown. Let cool completely on wire rack and break apart.

To make whipped cream cheese filling:
Beat together, softened cream cheese, honey, almond extract, and cinnamon. Fold in 1/2 c. whipped cream by hand until well incorporated.

To assemble:
Make sure the pumpkin tarts are cooled completely. Fill a pipet or ziploc bag (just cut off a small section of corner) with the remaining whipped cream. Pipet small rosettes on top of the pie and sprinkle a generous dose of candied almonds on top. Divide the cream cheese mixture among the remaining six tart shells. Top with fresh fruit and candied almonds. Enjoy!

Makes 15 + 6 extra tart crusts

Notes: Feel free to scale down the recipe so you don't have to make two kinds of tarts. Just decrease the crumb crust recipe by 1/3 and only make the pumpkin filling. You can also make extra tart shells and double, triple, or quadruple the cream cheese filling recipe to accomadate. I don't know...improvise! That's what I did. Good luck!

Tuesday, October 16, 2012

Recipe review: Food Network's "Truffle Brownies"

I know how stressful the past two weeks have been for me and I'm sure that a lot of you have experienced that mind-numbing panic and work as midterms encroached upon us. For me, nothing cures stress as well as chocolate. Well, in my opinion, nothing cures anything as well as chocolate does. I will admit it--I am a chocolate addict. I especially love baking so I find working with and consuming chocolate to be quite satisfying. Every month or so my grandmother even sends me a "Pound Plus" Dark Chocolate Bar from Trader Joe's (which I highly recommend as well). The recipe I want to share to help you all get through studying until morning or to celebrate the end of midterms (at least for the time being) is one of my personal favorites. I discovered it this summer when I reunited with my best friends from home for a girls' night. I wanted to make brownies but I didn't want your ordinary brownies. So I went to my favorite website, www.foodnetwork.com, and started a search. I stumbled upon Dan Smith and Steve McDonagh's recipe for "Truffle Brownies." I love truffles; I love brownies. So what could be bad about that? Absolutely nothing.

This recipe proved to be super easy and can be replicated in any sort of kitchen. Hint: although the recipe calls for the use of a hand mixer, we are college students. Unless you are an avid baker who had his/her mother bring you your personal hand maker during family weekend (i.e. me), this recipe can definitely be done without one. Whether you are having a movie night with some friends or want to take a break from work and treat yourself to something sweet and topped with a thick layer of chocolate ganache, I highly recommend trying this recipe. What could be better?

Here's the recipe, enjoy!

Thursday, October 11, 2012

Think Healthy: Frozen Treats


I don’t know about you, but I’m never satisfied until I’ve had dessert. I always crave something sweet from right when I wake up until the moment before I fall asleep. Most of the options at Wawa aren’t the healthiest, though, and I’ve finally learned that there are definitely better things to reach for than one of those ice cream milkshakes or a bag of chocolate covered pretzels!

My newest discovery is homemade ice cream with only one ingredient: bananas. Simply freeze a sliced banana, take it out, and stick it in a blender (Magic Bullets work great for this) for a few seconds, and you’ll get an amazing, creamy concoction that looks and feels like ice cream. Obviously, it tastes a bit like banana, but the flavor isn’t too strong. If you’re not a fan, try adding in peanut butter (or anything else of the sort, for that matter – even Nutella works), chocolate chips, or even frozen berries for a delicious, froyo-like dessert. Sure, you can get a similar dessert at Frobana, Philly’s new banana ice cream shop, but making it at home is just as easy! If you want to take it a step further, check out this awesome recipe from Averie Cooks for avocado banana ice cream. You can’t taste the banana at all, and this version has a way creamier texture. It’s also a lot more filling!

Ingredients
1 ripe avocado
1 medium banana (previously frozen in chunks)
1 tsp vanilla extract
1/2 cup milk (nut milk, vanilla flavored nut milk, milk, cream, or water can be used as substitutes)
1/2 cup sugar (agave or stevia work too)
1 cup ice cubes (optional)

Directions
Throw it all in a blender and mix away! My second go-to dessert is frozen grapes. I know it sounds weird, but give it a try. Just take some grapes (red is preferable to green because the green ones freeze rock solid) and after washing and drying them, take them off the stems and stick a plate of the grapes in the freezer. In a few hours, you’ll get these amazing fruity creations that taste like little popsicles – they’re irresistible! It doesn’t sound like much, but trust me, once you try frozen grapes, you’ll never go back to regular grapes again. Another great way to spice these up is by covering them in some Jello powder before you freeze them; my personal favorite is strawberry, but any flavor works great. Just shake the grapes up with some powder in a little Ziploc bag and you’ll have a healthy treat in no time!

Related Posts Plugin for WordPress, Blogger...